How can I move a point? I there a way to select a point and move it?
1 Like
You can move the 1st point ‘A’ that is on your drawing board when you start a pattern to any x/y co-ordinates that you wish. After that, all points are dependent on other points that are dependent on this point, so by changing the direction and length of that point will move it, depending on the tool that you used to create it. If you right click on the point, click on Options, all the details that are changeable will be available for editing.
I hope this makes sense  If you need further explanation, you’ll need to provide me with more details like pictures, the pattern file and measurement file.
1 Like
Hi Grace, thanks for your reply. What I would like to do is simply move a point using the cursor or type in a new coordinate in x and y. I understand that I can do that for the first point but for the others is it possible?
1 Like
@Intelli, I do not normally like to speak on behalf of another, but I will today because I believe you are a relative newcomer to the forum and @Grace is in another time zone and probably has retired for the evening.
The quick answer to your question about moving most points with the cursor or typing in new x,y coordinates is no, you can not do that.
The reason for this is that all points other than the origin point are calculated based on a formula. I am going to give you a pointer to a sample pattern so that you can see a bit about how this works. Please know that Grace is quite likely to help you tomorrow with your individual situation.
@Grace was the author of much of the “how to” information on the wiki.
I apologize if I am about to overwhelm you with too much information. Please check back to this forum tomorrow for a gentler approach. (without the feeling of being forced to drink from a firehose) ![]()
Look here if you want information about how to use the Seamly2D program. valentinaproject.org
Try reading this tutorial on the wiki about creating a simple shirt. https://wiki.valentinaproject.org/wiki/Tutorial_for_making_a_simple_shirt_(test)
If you prefer a video of someone using very basic features, try this link. https://www.youtube.com/channel/UC61WgbNdZ_wqxKf9PzJrjgA
Oh, and if I have not lost you yet, here is a simple test file for you to play with. It contains a “reference square” . I created it in these steps:
start with point A (given). Use first tool in “point” menu to create a line of 2" length at a “0” angle from A (point A1) Use third tool in “point” menu to create a line of 2" length perpendicular to line A1_A (Point A2) 0 degree angle Use third tool in “point” menu to create a line of 2" length perpendicular to line A_A1 (Point A3) 180 degree angle Use first tool in “Line” menu to connect point A3 with point A2. click “save” from top menu and save the pattern file. I named mine square.val. square.val (1.1 KB)
You can click on the name of the file in the previous sentence and download it to your machine.
Welcome to the forum. We are glad to have you.
1 Like
If you are able to load the square.val file, try “right click” on one of the points. From there, click options. You will see relevant information about that point and you can make changes to the information there.
1 Like
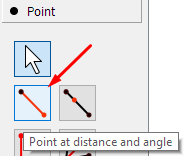
Hi @Intelli, no, as @kmf says, that’s not possible. I’m having to read between the lines and I’m guessing that you’re trying to lay 2 pattern pieces next to each other with a space in between. What I do that may help you, is I use the Point at Distance and Angle tool with a distance of 10cm and angle 0 degrees, line type None and change the label from the point at the extreme right, top.
You can, of course, use any values that suite you and take it from whichever point you prefer .
I hope this helps 