Hi,
I am trying to put gathers to my sleeve , using the rotate tool as what I want to do is separate the 4 parts at the top of the sleeve to add space for gathers, but cannot do it.
Could you help please ?
Thank you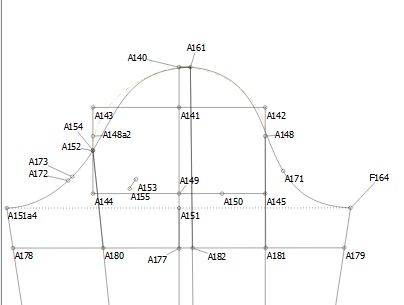
2 Likes
Have you read this thread? Slash and spread
I believe it may help. I am looking because I believe @Grace already did a separate tutorial on just the rotate tool but I do not remember where to find it
1 Like
Thank you very much, very interested link, I am going to study it tomorrow.
1 Like
I think that if you download the .val files and play with them, it will help.
Also, remember that the tool does not create lines, it creates points that you may connect to make the rotated lines.
1 Like
Here’s the link to the wiki: https://wiki.valentinaproject.org/wiki/Bell_Sleeve but everything is in the link that you mentions ![]()
@picholine, you will just reverse the instructions. Instead of spreading the hemline, you’ll be spreading the cap line.
1 Like
Thanks, Grace. I knew you had written good instructions on this. I just forgot where to look
1 Like
Hi,
I am improving and have been able to rotate to include the gathers, but I spent hours today trying to find the formula to have the same width of gathers unsuccessfully.
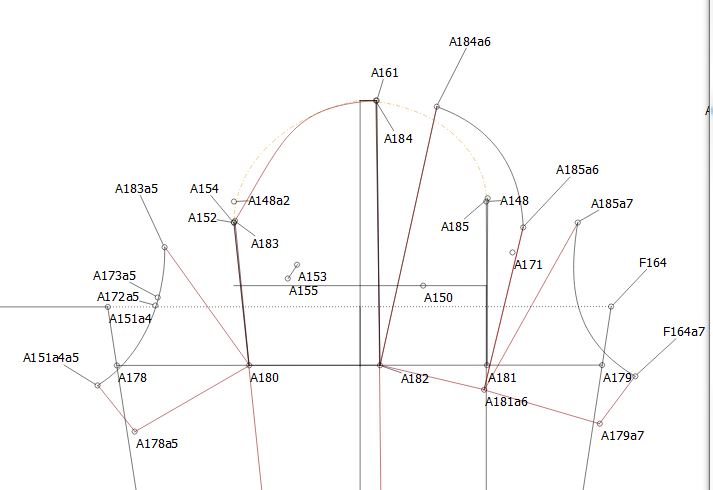
Could you please explain me how I should do ? : i.e :angles A183 - A180 - A183a5
A184-A184a6-A182
A185a6-A181a6-A185a7
So sorry.
1 Like
Let me see if I can explain this…
The centre (sleeve cap) needs to have a line on either side of the A161 that is half of the distance that you wish to rotate it so that there is equal distance rotation on both sides. It may help you to make these new lines in a different colour so that you can see them and know that they are your distance lines.
Then you need to draw a line at right-angle to A152 (to the left) that is the distance that you would like to rotate, and the same at point A148 but to the right.
So then you will use these new points in your formula, so… first you will move A178, A151a4 and A152 (The left side) away from A152 to the new point created to the left of A152. Then you can do the same on the right side.
Then you will move the left side to the centre line including the points above that you moved to the left referencing the new point to the left of the centre line in your formula, and repeat for the right side.
You will then have to redraw the curve so that it has a smooth appearance.
I’ll make some pictures for you in the morning. 
1 Like
I start by hiding everything in groups and create a group of only the things I want to use:
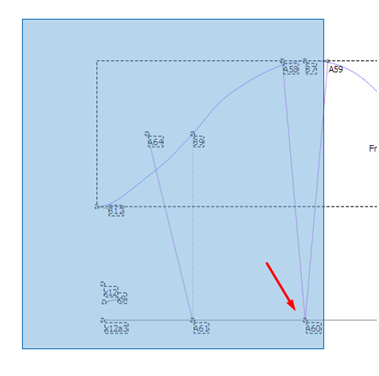
Next, working from the centre to the left, and using the Rotation Tool, I dragged a box from the outside of the pattern to just cover the line at B7 and then, holding the Ctrl key, I click on my rotation point A60 to deselect it, and hit Enter. I select A60 as the rotation point and rotate it a bit and hit Enter again to accept. Then I change the formula using the Angle of Line option as in the picture below:
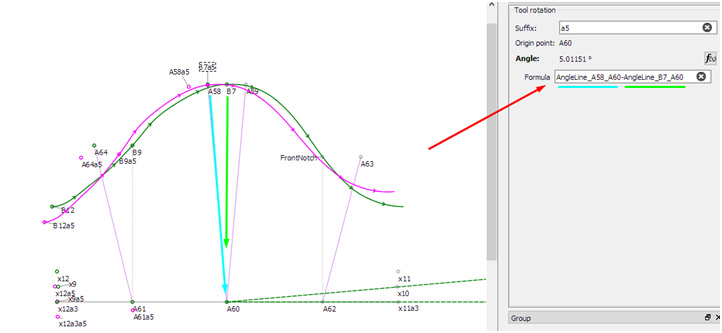
Repeat for the left side rotation.
NB: Remember that while your AngleLine reference point are A64 and B9, the Axis point has now moved to A61a5.

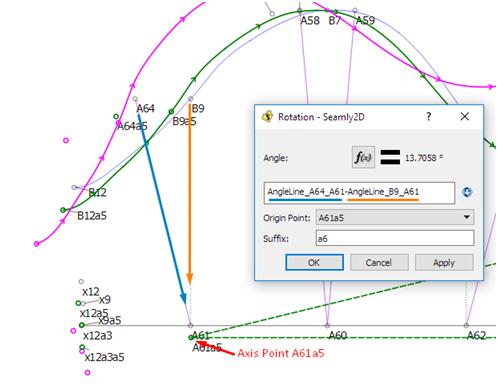
Repeat this for the other (right) side remembering to take the point on the right and minus the point on the left to get the correct degree of rotation.
Now you can redraw your lined and curves.
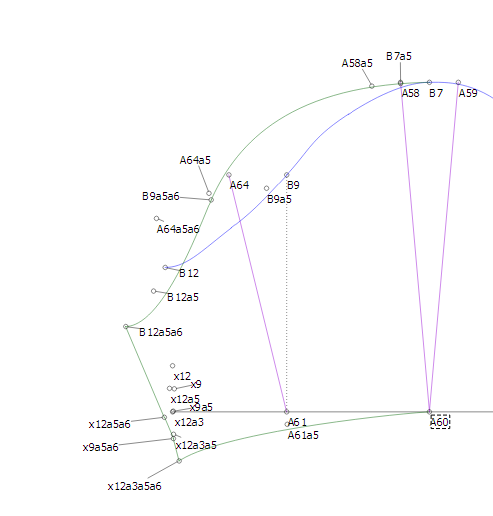
Here I’ve redrawn the lines and curves in dark green for the left side to give you an idea. I’m thinking that you don’t want any gathers under the arm, only between the back notch and the centre line:
You may want to rotate the bottom hemline outwards a bit to create more distance between the shoulder tip and the hemline to make for a more puffy effect 
2 Likes
Thank you Grace, it sounds a bit complicated but I think That with your explanations and photos I have understood. I will try it tonight, and let you know. Merci beaucoup
1 Like
Hi Grace, After many trials for about two hours , I finally did it. I am very happy as it will be useful for many drawings. Thank you once again so much. How do you happen to know all this ? Have a lovely day.
2 Likes
Hi, @picholine
How do I know all this? Like everyone else, I found a free pattern making software, downloaded it and then found out that I need to know HOW to make patterns before I could use it. This was all in Febraury 2017. So then I hit the internet to learn how to make patterns and tested them on the software. But then I found out that I need to know what all the tools do, so I decided to make a manual on how they work while I learnt how to use them
I found a few pattern making books and spent the rest of the year learning the intricacies of making patterns. Now I’m pretty confident that I can make decent patterns on a very decent program that some very caring and clever people created.
Now, I give back to the program by helping other people who find Seamly2D to learn how to use the program since I can’t contribute with programming  to add new features or enhance it in any way.
There are a lot of people on here who do the same. If I can’t reply to a query because I don’t know, some one else will be sure to reply who does know. Everyone is welcome to help when help is asked for, in any way which they can. We all have day-time jobs, so we all pitch in when we can And we are all friendly, so please feel free to let us know when you’re stuck again
When you have a moment, at the top of the screen is a link to the User Manual and the You Tube videos, go & browse around there, where you will find some very useful information. Some of the info has been translated into French, so if you right-click on the page, you can choose to translate it.

3 Likes
Interesting to know how you got there. I took online classes of Suzy Furrer from Craftsy for drafting patterns, and she is a great teacher. Her classes are very clear and precise. But working with a software is something very different and I did make a copy of the seamly2D manual and I watched all the videos regarding Seamly2D I could find, but in your explanations I found little tips I did not see in the manual. Also, when I was trying the find the good formula for my gathers, I ask my husband for some help as he is good in mathematics, but we could not transfer his formula to Seamly2D. Also he does not understand the “angle line “ of Seamly2D as for him an angle needs 3 points and not 2. May be you can explain this ? Anyway, I am very grateful to you and all others dedicating some of their time to help new users, it is so nice of you.
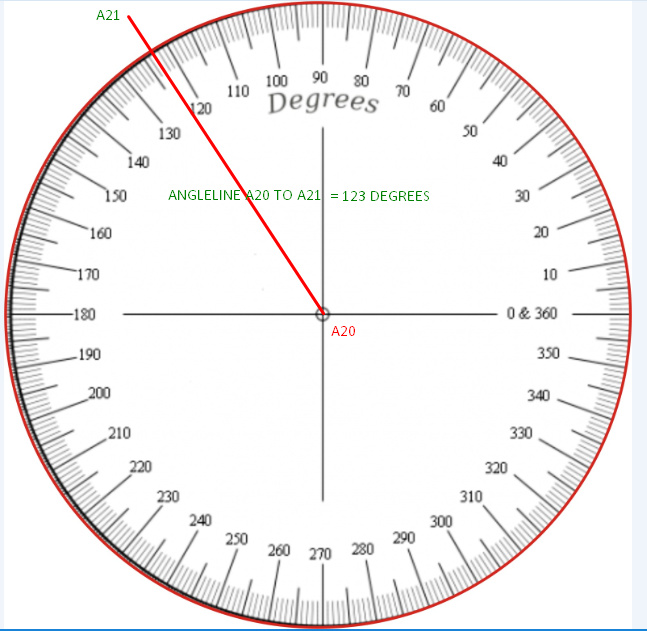
The compass that Seamly works with is a full circle that starts at 0 on the right and rotates all the way around to 360 which is the same place as the 0 on the right. 90 degrees is straight up, 180 is to the left and 270 is straight down. These are all from the centre of the circle which is the node (e.g. A20). So the angle of the line will be measured from the centre in the direction that the line is going in and shown if one would place a compass over the drawing.
If you look at the picture below, point A21 is above and to the left of A20, the line passes through the 123 degree mark on the compass:
So that’s basically it. That’s why you need to have the reference lines for the rotation - so that you can deduct the one line angle from the other line angle to rotate the pattern by a certain amount. (It’s just the way I do it - I’m sure there are more scientific methods, but this is easy for me ![]() )
)
I hope this will explain it very nicely to your hubby ![]()
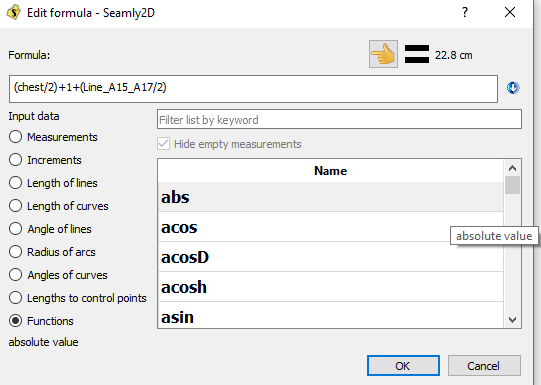
There are also all sorts of functions one can use in the formulas if you are really mathematical:
1 Like
Great, my hubby is happy but a bit surprised  :
Have a nice evening
:
Have a nice evening
1 Like
Haha, ok, my maths stopped with arithmatic
1 Like
LOL, thanks @kmf. If I have to tell you how many hours I’ve spent on the internet studying up on it… in my efforts to learn HOW to make patterns
1 Like
Yes Grace , you are doing wonderful !
3 Likes